I've been checking out a lot of cookbooks from the library, and have a scanner. What does that mean? Tons of scanned-in recipes and no virtual cookbook to keep them in. That all changes now. I just created cookbookmonster, a virtual repository of all my scanned-in library book recipes (and some of my faves from cookbooks I have at home).
Since TECHNICALLY posting copywrited material on the internet without permission is illegal, you'll need to sign up for a wordpress I.D. (wordpress.com/signup/only create ID) and comment to this post if you want to be added in the "users who can see this blog." Furthermore... let me know if you want to be part of the cookbookmonster project too! The more content we have, the cooler our virtual cookbook can be! (And who knows... someday we could blow outta this virtual popsicle stand and maybe get a website that is better than a blog for this particular purpose.)
Happy almost New Year, and sign up for a wordpress account!
xo, Caroline :)
**Edit: comment with your Wordpress ID's! Then I'll add you, and you will be able to see all my hard work ^_^
Tuesday, December 30, 2008
Sunday, December 28, 2008
Smokin' Hot!
I decided that ye olde Cast Iron Maiden blog deserved one more post before 2008 comes to an end. I feel bad that this blog has mostly been ignored since its conception, especially since the blog has such a clever and witty name. Cast Iron Maiden?! C'mon, it doesn't get much better than that.
Recently I've been pretty much obsessed with Hugh Fearnley-Whittingstall's River Cottage series of TV shows and cookbooks. Hugh is a British celebrity chef known largely to his "back to basics", "real food" campaigning. He's a large supporter of buying only free-range or organic meats and practicing nose-to-tail eating philosophies.
Basically, he's a cooking bad ass.
In an episode of 2007's River Cottage: Gone Fishing, Hugh fashions an on-the-go smoker out of an old tin bread box. Personally, I've always thought smokers to be complex things which only should be handled by the manliest of men, the BBQ Kings. Smoking meat seemed to be right there with muscle cars, cheap beer and lawn maintenance. Imagine my surprise to see Hugh, with his glasses and luscious locks of hair, smoke a freshly caught fish without batting an eye lash. Obviously, smoking meat wasn't just for the BBQ Kings.
In fact, slow drying in the sun or by a fire has been used for food storage in cultures the world over. While today we largely use smoking to enhance flavor and texture, prior to refrigeration it was immensely important in preserving perishable foods. Humans have been smoking meat and fish for as long as we've been doing just about anything. You can read more about the history of smoking here.
Seeing that my ancestors were probably smoking meat successfully hundreds and hundreds of years ago, I decided to give it a try. If cavemen can do it, so can I, right?
It turns out that, for once in my life, I was right. Smoking is really really easy. When you get down to it, smoking food is a pretty simple concept that only needs a few key elements. You need a heat source. You need something to smoke. You need a container to contain your smoke. It turns out that building a homemade smoker is really easy too. In the episode of River Cottage: Gone Fishing that inspired all this, Hugh fashioned a smoker out of an old metal bread box which he placed over a fire. My smoker has a few more parts, but not many. My container is a metal trashcan (new, in case you were worried). I used a hot plate for my heating element and purchased some hickory wood chips to provide the smoke. Drill a few holes and add a BBQ rack, and you too could have a homemade smoker. While I didn't follow the directions on this website, the smoker here is almost identical to the smoker I made.
Upon completing the smoker, I smoked a pound and a half of salmon and two turkey thighs. Getting them up to temperature (150 F for salmon, 165 F for turkey) took several hours but the taste was sure worth it!
If you decide to do some smoking yourself, here are a few tips:
- Soak your chips! Unsoaked chips will not smolder and smoke as well as wet ones. Soak chips for at least 30 minutes prior to smoking. If you don't use your chips all at once, keep them in water. They will dry out and leave you smokeless when you least expect it!
- Think salt! Smoke and salt are a match made in heaven. Consider the salt content of the meat you're about to smoke. Turkey, which is injected with a salt water solution, will be tasty placed straight in the smoker. Other meats may need to be salted, cured or even brined. Check out this smoked salmon recipe from Alton Brown for an example of curing!
- Experiment! Keep in mind that humans have been successfully smoking meat for centuries without recipes. Don't be afraid to try something new!
Sunday, June 8, 2008
Redneck Recipe
Here's proof that I haven't gotten nearly as far away from my kin in the Midwest as I would like to believe. This is recipe is so easy and the ingredients are all in your pantry. Seriously. Stephen, if you're reading this, even you could make this without difficulty.
Not only is this easy, but it's surprisingly good tasting.

Ingredients:
Toppings:
Preheat your oven to 400 degrees. Lightly grease a 12 inch cast iron skillet with butter and place in the oven.
Whisk the cornbread mix, egg and milk together in a small bowl. Mixture should look somewhat lumpy. Add the chili, cheese and red pepper flakes. Don't worry about measuring, this is an art, not a science.
Wait 10 or so minutes after the oven has heated up to make sure your skillet is nice and hot. Pour batter into skillet. Cook for 20-25 minutes, or until a toothpick stuck in the middle comes out clean.
Cut into wedges and top with guacamole and sour cream. Best accompanied by cheap beer and served on paper plates. Use plastic cutlery. Paper towels should be substituted for napkins for authenticity.
Wanna make it even more white trash? Slice a hot dog or two into bite-size pieces and add them in with the chili.
Not only is this easy, but it's surprisingly good tasting.
White Trash Casserole

Ingredients:
- Butter (just a tad)
- 1 Box of Jiffy Cornbread Mix
- 1 Egg
- 1/3 cup Milk
- 1 to 1 and 1/2 cups Chili (homemade would be awesome but mine came from a jar)
- 1 cup grated Cheddar Cheese (approximately)
- Red Pepper Flakes (to taste)
Toppings:
- Guacamole
- Sour cream
Preheat your oven to 400 degrees. Lightly grease a 12 inch cast iron skillet with butter and place in the oven.
Whisk the cornbread mix, egg and milk together in a small bowl. Mixture should look somewhat lumpy. Add the chili, cheese and red pepper flakes. Don't worry about measuring, this is an art, not a science.
Wait 10 or so minutes after the oven has heated up to make sure your skillet is nice and hot. Pour batter into skillet. Cook for 20-25 minutes, or until a toothpick stuck in the middle comes out clean.
Cut into wedges and top with guacamole and sour cream. Best accompanied by cheap beer and served on paper plates. Use plastic cutlery. Paper towels should be substituted for napkins for authenticity.
Wanna make it even more white trash? Slice a hot dog or two into bite-size pieces and add them in with the chili.
Monday, May 19, 2008
Allergies, schmallergies...
I suppose a bit of groveling is in order to make up for the utter late-ness of this posting, but I do have a good excuse... sort of!
To make a long story short... I've been having digestive issues for the past year that I finally (about a month and a half ago) sought medical help for. Turns out... it's IBS (better known as Irritable Bowel Syndrome... yummy, I know...) and that the likely culprits are a wheat and dairy allergy. I went completely wheat and dairy (and corn, peanut, citrus fruit and strawberry) free for a month, and felt about 150% better. The process of re-introducing foods back into my diet began about a half a month ago, and now I am back to being simply wheat and dairy free.
And I started eating fish.
What does all of this mean?
I had to, more or less, completely re-think the way I cook. Out goes anything with wheat or gluten. Out goes anything with dairy or casein. More or less I was not eating too much dairy before this whole food allergy fiasco really came to a head, but now I'm religiously reading labels. It just makes my whole body feel better to avoid them. No more seitan burgers on whole wheat, no more hefeweisens with pizza smothered in cheese... but that doesn't mean I just eat rice and vegetables (well, atleast not ONLY rice and vegetables!)
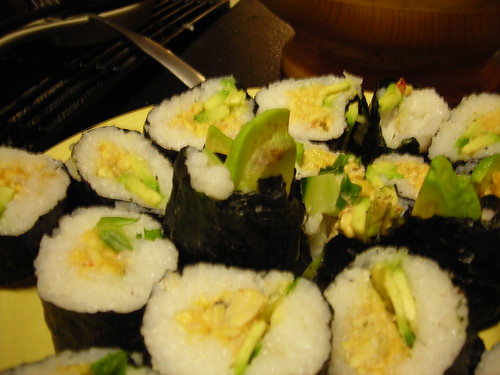
For instance... I have been eating delicious vegan sushi with a creamy spicy tempeh filling...
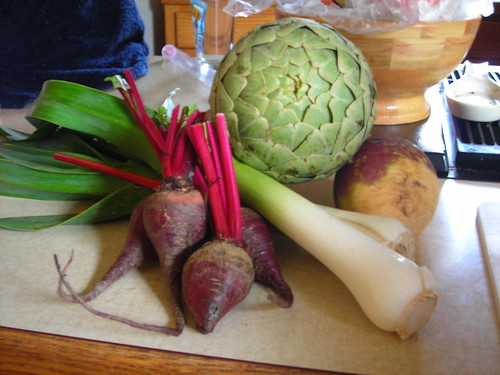
...or an assortment of delicious roasted vegetables (from the Saturday Market no less) made into gluten-free pasties !
So I'm updating to say that MY trajectory with this blog will be shifting course to document my discoveries in delicious gluten-free, casein-free cuisine. So check back and I will be posting recipes, pictures, and hopefully not too much whining about missing my beer and pizza.
To make a long story short... I've been having digestive issues for the past year that I finally (about a month and a half ago) sought medical help for. Turns out... it's IBS (better known as Irritable Bowel Syndrome... yummy, I know...) and that the likely culprits are a wheat and dairy allergy. I went completely wheat and dairy (and corn, peanut, citrus fruit and strawberry) free for a month, and felt about 150% better. The process of re-introducing foods back into my diet began about a half a month ago, and now I am back to being simply wheat and dairy free.
And I started eating fish.
What does all of this mean?
I had to, more or less, completely re-think the way I cook. Out goes anything with wheat or gluten. Out goes anything with dairy or casein. More or less I was not eating too much dairy before this whole food allergy fiasco really came to a head, but now I'm religiously reading labels. It just makes my whole body feel better to avoid them. No more seitan burgers on whole wheat, no more hefeweisens with pizza smothered in cheese... but that doesn't mean I just eat rice and vegetables (well, atleast not ONLY rice and vegetables!)
For instance... I have been eating delicious vegan sushi with a creamy spicy tempeh filling...
...or an assortment of delicious roasted vegetables (from the Saturday Market no less) made into gluten-free pasties !
So I'm updating to say that MY trajectory with this blog will be shifting course to document my discoveries in delicious gluten-free, casein-free cuisine. So check back and I will be posting recipes, pictures, and hopefully not too much whining about missing my beer and pizza.
Sunday, May 4, 2008
My Apologies
Oh Blog, I never meant to neglect you for this long. I'm ever so sorry. You see, I've just been busy with school. I suppose I've also been distracted by margaritas and the decent weather we've finally begun to have. But I've been unfair to you. I hope you'll forgive me.
I don't have much to post now, but I will let you know that I've learned of a fab way to jazz up your every day coleslaw. Just add a few dashes of Frank's Original RedHot Sauce to your regular slaw dressing for a little pizazz. You'll like it, I swear!
More posts to come soon.
I don't have much to post now, but I will let you know that I've learned of a fab way to jazz up your every day coleslaw. Just add a few dashes of Frank's Original RedHot Sauce to your regular slaw dressing for a little pizazz. You'll like it, I swear!
More posts to come soon.
Saturday, April 5, 2008
M.I.A.
Here is another link for you to check out until I'm feeling well enough to post something with substance.


Check out more images at the source.
Source: Food Art
The art of photographer Carl Warner painstakingly captures all forms of food in a series of still lifes with edible ingredients he raided from his kitchen cupboards to design a series of dreamy landscapes and homey domestic scenes that appear scrumptiously good enough to eat.
Check out more images at the source.
Source: Food Art
Thursday, March 13, 2008
Wednesday, March 5, 2008
SuperCook
How often have you stumbled home after a long day, exhausted and starving, and wished you could only find a delicious recipe that only used ingredients you already had lying around the house?
Last night I was stumbling around the internet when I happened upon what appears to be a rather ingenious website, SuperCook. Register an account and enter the ingredients that you currently have on hand in your kitchen. The site will then build lists of entrees, desserts and hors d'oeuvres that contain the ingredients you've listed! Talk about handy! The site will also list recipes that you have almost all the ingredients for and will suggest a future shopping list.
There does seem to be a problem or two with the site. For instance, there is no way to specify things like vegetarianism or food allergies, which would really help to make the shopping list feature more personalized and accurate. Still, it seems like SuperCook has strong potential to be a really helpful website. You should definitely check it out!
Monday, March 3, 2008
Tofu Jambalaya with Mississippi Red Beans
Tonight Eric was craving creole food, so I looked up the ingredients for a tofu jambalaya and found a fabulous recipe at Fat Free Vegan. In order to make it a whole meal, I also improvised a recipe for Mississippi Red Beans. The whole meal was really easy to make, filling, and super tasty and good-smelling.
Which I then sauteed until soft. As soon as it was ready, I set it aside with a lid to keep it warm and waited until the beans were done to set them aside to de-pressurize.

Next, I worked on the jambalaya. Here's the pretty lineup of the ingredients:

It was a very simple recipe which involved chopping up a giant onion, orange bell pepper, and 2 ribs of celery and then sauteeing them in a stock pot. Here's the veggies:

I added one cup of white rice (the recipe even specifies that brown rice is not very good with the jambalaya... I ALWAYS use brown rice but the white rice was the perfect texture when all was said and done) and four cloves of chopped garlic and fried the rice a little bit with the veggies. Finally, I added 2 cans of diced tomatoes, 1/2 a cup of vegetable broth, and some liquid smoke. Then I added this delicious mountain of chopped tofu:

Let this whole mixture simmer on low heat for over 30 minutes until the rice is soft. Then you get this delicious combination in my bowl, all ready to eat:

...tofu jambalaya and Mississippi red beans! It was a definite hit!
Caroline's Mississippi Red Beans
1 c. dried kidney beans (or probably 2 cans of kidney beans)
4 c. H2O (or 2 cups h2o, 2 cups veg broth)
4 cloves garlic, chopped
1 onion, chopped and sauteed
1 bell pepper, chopped and sauteed
1 tsp. liquid smoke (or to taste)
2 tsp olive oil
cayenne to taste
cajun spice to taste
salt to taste
To start, I used dried kidney beans so I had to sort through them to remove any split or damaged beans. Here are my pretty red beans on a plate: 
1 c. dried kidney beans (or probably 2 cans of kidney beans)
4 c. H2O (or 2 cups h2o, 2 cups veg broth)
4 cloves garlic, chopped
1 onion, chopped and sauteed
1 bell pepper, chopped and sauteed
1 tsp. liquid smoke (or to taste)
2 tsp olive oil
cayenne to taste
cajun spice to taste
salt to taste
To start, I used dried kidney beans so I had to sort through them to remove any split or damaged beans. Here are my pretty red beans on a plate:

Next, I rinsed them and put them in the pressure cooker with a dash of olive oil and seasoned the water with liquid smoke, salt, bay leaves, and set it to pressure cook for 25 minutes. In the mean time, I chopped up one medium onion, one green bell pepper and 4 cloves of garlic:

Which I then sauteed until soft. As soon as it was ready, I set it aside with a lid to keep it warm and waited until the beans were done to set them aside to de-pressurize.

Next, I worked on the jambalaya. Here's the pretty lineup of the ingredients:

It was a very simple recipe which involved chopping up a giant onion, orange bell pepper, and 2 ribs of celery and then sauteeing them in a stock pot. Here's the veggies:

I added one cup of white rice (the recipe even specifies that brown rice is not very good with the jambalaya... I ALWAYS use brown rice but the white rice was the perfect texture when all was said and done) and four cloves of chopped garlic and fried the rice a little bit with the veggies. Finally, I added 2 cans of diced tomatoes, 1/2 a cup of vegetable broth, and some liquid smoke. Then I added this delicious mountain of chopped tofu:

Let this whole mixture simmer on low heat for over 30 minutes until the rice is soft. Then you get this delicious combination in my bowl, all ready to eat:

...tofu jambalaya and Mississippi red beans! It was a definite hit!
Saturday, March 1, 2008
Chilaquiles with Soyrizo
This is a modified version of the chilaquiles recipe found on page 253 of my trusty Laurel's Kitchen cookbook. Nate made it for the first time a few weeks ago, adding some soyrizo for added flavor and protein. I liked it so much, I asked him to make the same thing today for a late breakfast!
Ingredients:
Heat oil in cast iron skillet. Add tortillas, stirring frequently. Meanwhile, place enchilada sauce and cottage cheese in food processor. Blend until smooth.
Once the tortillas appear soft and lightly coated with oil, pour the enchilada/cottage cheese mixture over them. Sprinkle with grated cheddar cheese and chili powder as desired. Cover and cook over medium heat until cheese is melted and sauce is bubbling.

Meanwhile, heat some oil in a small skillet. Add Soyrizo and cook until preferred crispiness is reached. Or, cook according to directions on package.
Serve chilaquiles topped with soyrizo, cilantro, onion and radish, with a side of rice and beans.

Enjoy!
Ingredients:
- 12 Corn Tortillas, cut into 2 inch pieces
- 2 T Vegetable Oil
- 10 oz. can Enchilada Sauce
- 1 and 1/2 cups Cottage Cheese (lowfat is a-ok)
- Grated Cheddar Cheese
- Chili Powder
- 1/2 pack of Soyrizo
- 4 Radishes, sliced
- 1/4 Onion, chopped
- Cilantro, coarsely chopped
Heat oil in cast iron skillet. Add tortillas, stirring frequently. Meanwhile, place enchilada sauce and cottage cheese in food processor. Blend until smooth.
Once the tortillas appear soft and lightly coated with oil, pour the enchilada/cottage cheese mixture over them. Sprinkle with grated cheddar cheese and chili powder as desired. Cover and cook over medium heat until cheese is melted and sauce is bubbling.

Meanwhile, heat some oil in a small skillet. Add Soyrizo and cook until preferred crispiness is reached. Or, cook according to directions on package.
Serve chilaquiles topped with soyrizo, cilantro, onion and radish, with a side of rice and beans.

Enjoy!
Tuesday, February 26, 2008
Adventures in Pastamaking
It's the end of the month and we are down to next-to-nothing in our cupboards, but I was still craving something special for dinner tonight (more special than "random vegetables with rice" or "fend-for-yourself"). I craved a certain something... carb-y, delicious... pasta! I wanted to make my own since I have never done it, and I was worried I would be a little inhibited without a pasta making press. Fortunately, I tried out this recipe and it worked great! The noodles turned out kind of funky-shaped, but I'll explain that more along the way.

Then, in a bowl, I combined the dry ingredients and mixed them well and added them, 1 cup at a time, to the egg mixture and pulsed with the food processor until I had a thick, non-sticky dough.

I tranferred it to my well-floured counter to knead it for about 5 minutes. Look at the cute dough blob:

After I kneaded it, the ball sat for about 10 minutes under a rag before I started to roll it out. And let me tell you... if you don't have a pasta machine, this is where your arms get involved. Like, really involved. It took me a long time to roll these suckers out. Below you can see yours truly huffing and puffing away while desperately trying to get the dough as flat and thin as possible:

Finally, I decided to cut the dough into two pieces and work on each one separately to try and get them thin. Here's a cross- section to show you the dough-y goodness:

Cutting it in half made it much easier to get the dough fairly thin. I first rolled it out into a long sheet like this:

Then I rolled it up like a big jelly roll and used a sharp knife to cut thin ribbons out of the jelly roll (you just need to cut slices and they unroll into noodles!)

Then I wound up with a bowl full of mutant-shaped noodles like this. Actually I prefer the term unique and beautiful, or atleast rustic.

The cut noodles need to be kept under a cloth since they dry out quickly, and should either be prepared immediately or dried and stored. Before I could cook the noodles I had to make some kind of a sauce to put with them, so I threw this little baby together:

And finally, here is Eric's plate: steamed asparagus, a big spinach salad, and the noodle/sauce combination topped with parmesan and some pine nuts. YUM!

Now I can happily digest for a while and make room for another one of Meggie's kickass truffles...
(Mad props to Stephen for being the main pornographer here as I cooked... your camera kicks ass)
Homemade Noodles (Yield: 4-6 servings)
4 eggs
1/2 c. durum or semolina flour
2 1/2 c. all-purpose flour
1/4 tsp. salt

First, I put the eggs in my trusty Cuisinart food processor and whipped them up until they were completely blended.4 eggs
1/2 c. durum or semolina flour
2 1/2 c. all-purpose flour
1/4 tsp. salt


Then, in a bowl, I combined the dry ingredients and mixed them well and added them, 1 cup at a time, to the egg mixture and pulsed with the food processor until I had a thick, non-sticky dough.

I tranferred it to my well-floured counter to knead it for about 5 minutes. Look at the cute dough blob:

After I kneaded it, the ball sat for about 10 minutes under a rag before I started to roll it out. And let me tell you... if you don't have a pasta machine, this is where your arms get involved. Like, really involved. It took me a long time to roll these suckers out. Below you can see yours truly huffing and puffing away while desperately trying to get the dough as flat and thin as possible:

Finally, I decided to cut the dough into two pieces and work on each one separately to try and get them thin. Here's a cross- section to show you the dough-y goodness:

Cutting it in half made it much easier to get the dough fairly thin. I first rolled it out into a long sheet like this:

Then I rolled it up like a big jelly roll and used a sharp knife to cut thin ribbons out of the jelly roll (you just need to cut slices and they unroll into noodles!)

Then I wound up with a bowl full of mutant-shaped noodles like this. Actually I prefer the term unique and beautiful, or atleast rustic.

The cut noodles need to be kept under a cloth since they dry out quickly, and should either be prepared immediately or dried and stored. Before I could cook the noodles I had to make some kind of a sauce to put with them, so I threw this little baby together:
Caroline's Lentil-y Tomato Sauce (Yield: 4-6 servings)
2 tsp. olive oil
4 cloves garlic
6 mushrooms
1/2 c. red lentils
3/4 c. water
1/2 tsp. each: basil, oregano and rosemary
dash cayenne (or more if you want it hot!)
dash curry powder
salt to taste
Can of tomatoes
1 tbsp. tomato paste
1 tbsp. balsamic vinegar
2 tsp. olive oil
4 cloves garlic
6 mushrooms
1/2 c. red lentils
3/4 c. water
1/2 tsp. each: basil, oregano and rosemary
dash cayenne (or more if you want it hot!)
dash curry powder
salt to taste
Can of tomatoes
1 tbsp. tomato paste
1 tbsp. balsamic vinegar
Basically, I heated the oil over medium heat in a medium-sized sauce pan, sauteed the garlic and mushrooms, tossed the lentils around in the oil, then added the water and spices. Bring it all to a boil and then cover and simmer for 10-12 minutes, or until the lentils are soft. Once they are soft, add the can of tomatoes, tomato paste, and vinegar and stir it all up. Toss it with the noodles!
Cooking the noodles was super easy, just bring a large pot of water to a rapid boil and drop the noodles in for 3 minutes, until they are al dente. Here are the noodles in their hot bath:
Cooking the noodles was super easy, just bring a large pot of water to a rapid boil and drop the noodles in for 3 minutes, until they are al dente. Here are the noodles in their hot bath:

And finally, here is Eric's plate: steamed asparagus, a big spinach salad, and the noodle/sauce combination topped with parmesan and some pine nuts. YUM!

Now I can happily digest for a while and make room for another one of Meggie's kickass truffles...
(Mad props to Stephen for being the main pornographer here as I cooked... your camera kicks ass)
Welcome!
Welcome to Cast Iron Maiden, a simple blog about some friends on the culinary adventure that is life.
Caroline and I recently decided it was time for us to begin recording our great food successes (and occasional disasters) so that they might be shared with the masses. My hope is that this blog will give us the opportunity to share a little bit of our daily lives with family and friends, as well as provide us with a chance to discuss one of everyone's favorite topics: food!
While this will technically be a food blog, don't be surprised if you find a dash of personal ranting and a pinch of funny youtube videos mixed in with the recipes and food porn. We might even throw in some crafting for good measure. After all, we are people of many talents and our blog should definitely reflect that!
Subscribe to:
Posts (Atom)